Mac下利用Github Pages快速搭建免费博客

本博客利用Hexo + Next + GitHubPages 搭建博客。

准备工作

安装node.js

1
$ brew install node

安装 git

1
$ brew install git

安装yarn

1
$ npm install yarn

如果安装失败用

1
$ brew install yarn

安装hexo

进入你的项目目录,举个例子我的目录是blog

1
$ cd blog

然后用 yarn 安装 hexo

1
$ yarn add hexo -S

如果安装失败用

1
2
$ npm install hexo-cli -g
$ npm install hexo-server --save

详细可见官方文档

搭建本地博客

项目初始化

进入你的项目目录,初始化hexo

1
2
$ cd blog
$ hexo init

安装依赖

1
$ yarn install

启动本地服务

1
$ hexo server

在浏览器输入 localhost:4000 即可

关联 GitHub

创建项目

创建项目

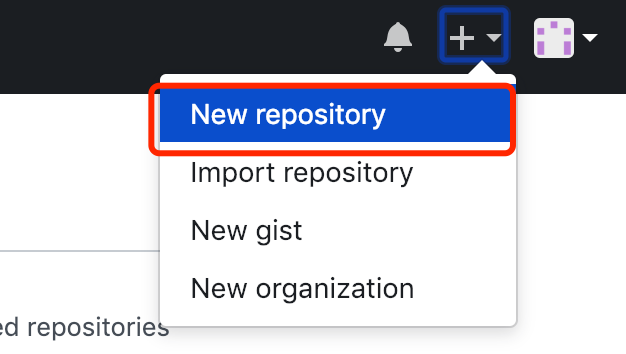
项目名称一定一定是 [用户名].github.io
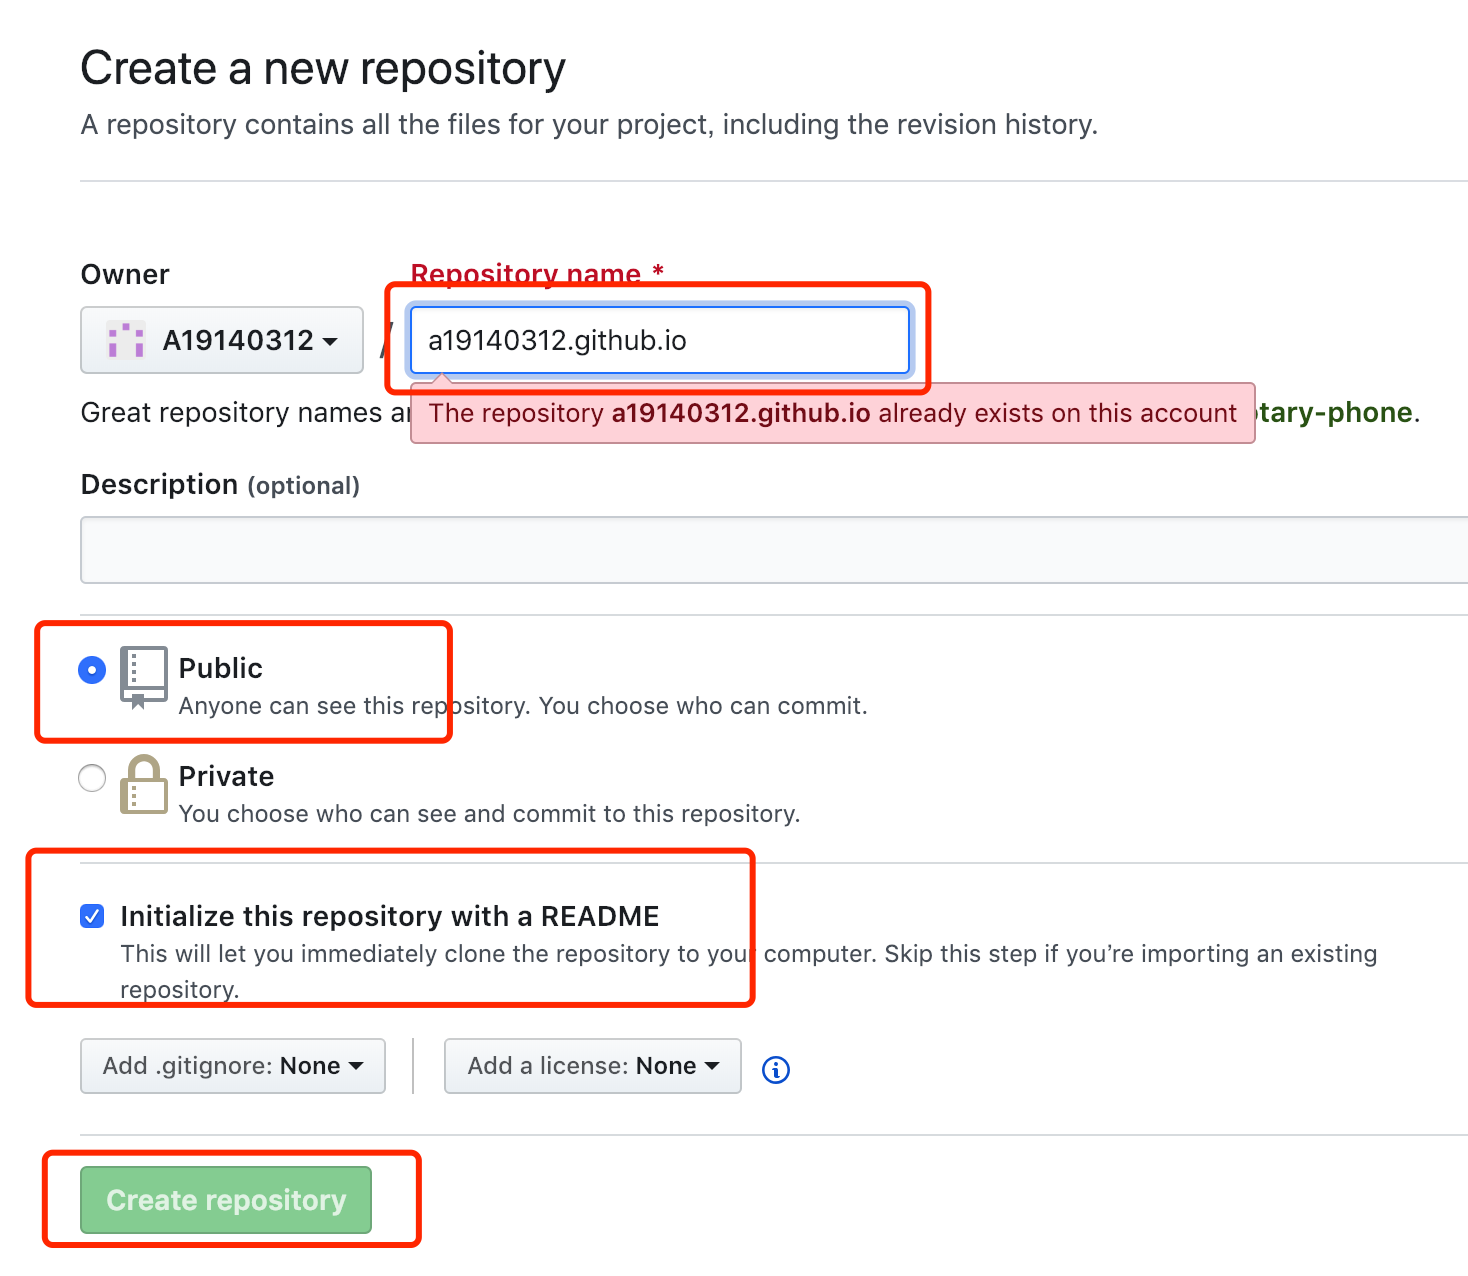
创建项目

设置

设置

在设置中找到GitHub Pages ,分支选择master,点击choose a theme

设置github-pages

选择喜欢的主题,点击select theme即可
选择主题

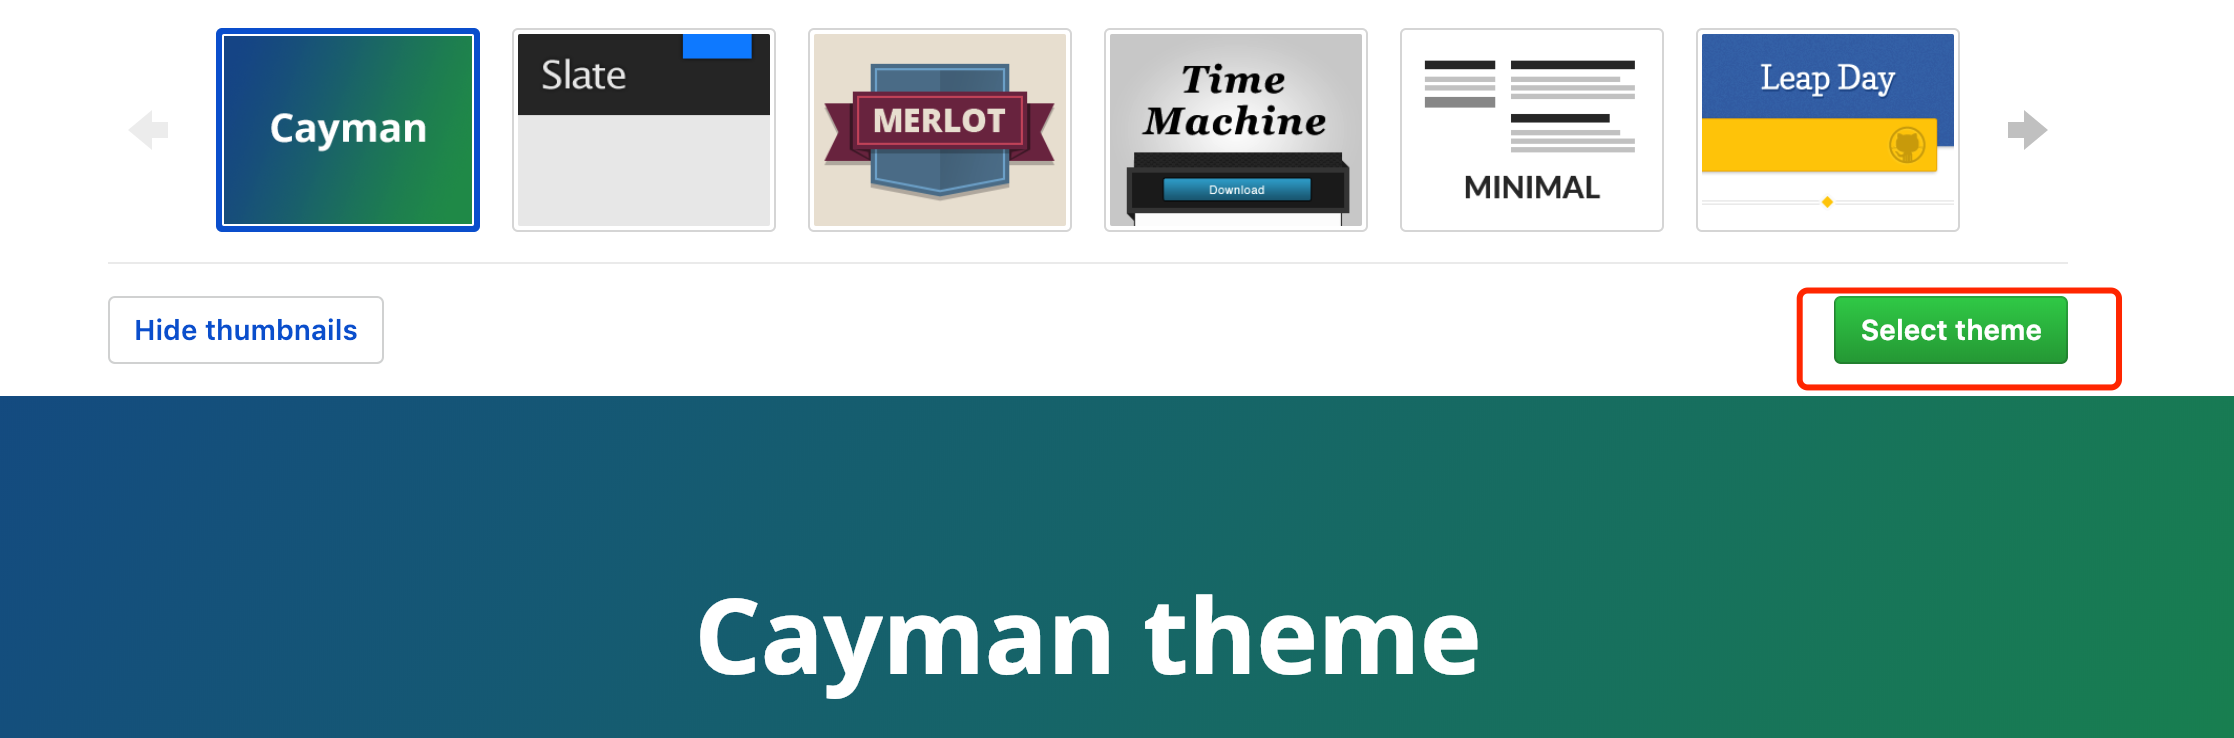
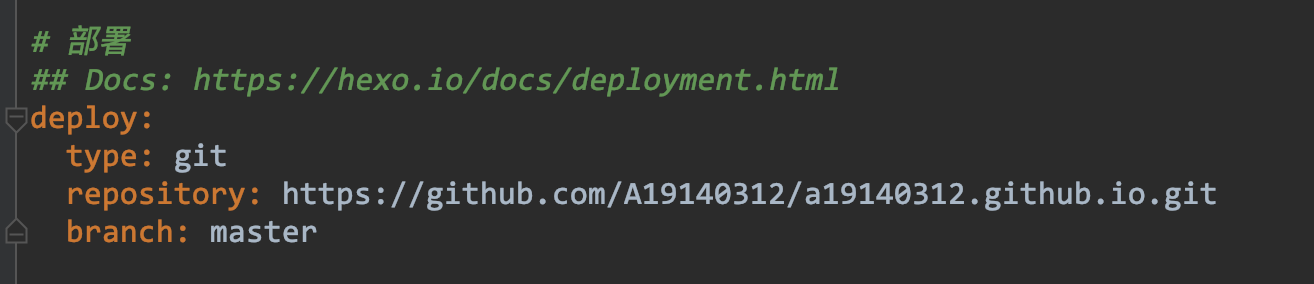
到这里就可以访问你的主页啦 https://[用户名].github.io/,接下来复制你的项目链接

复制项目链接

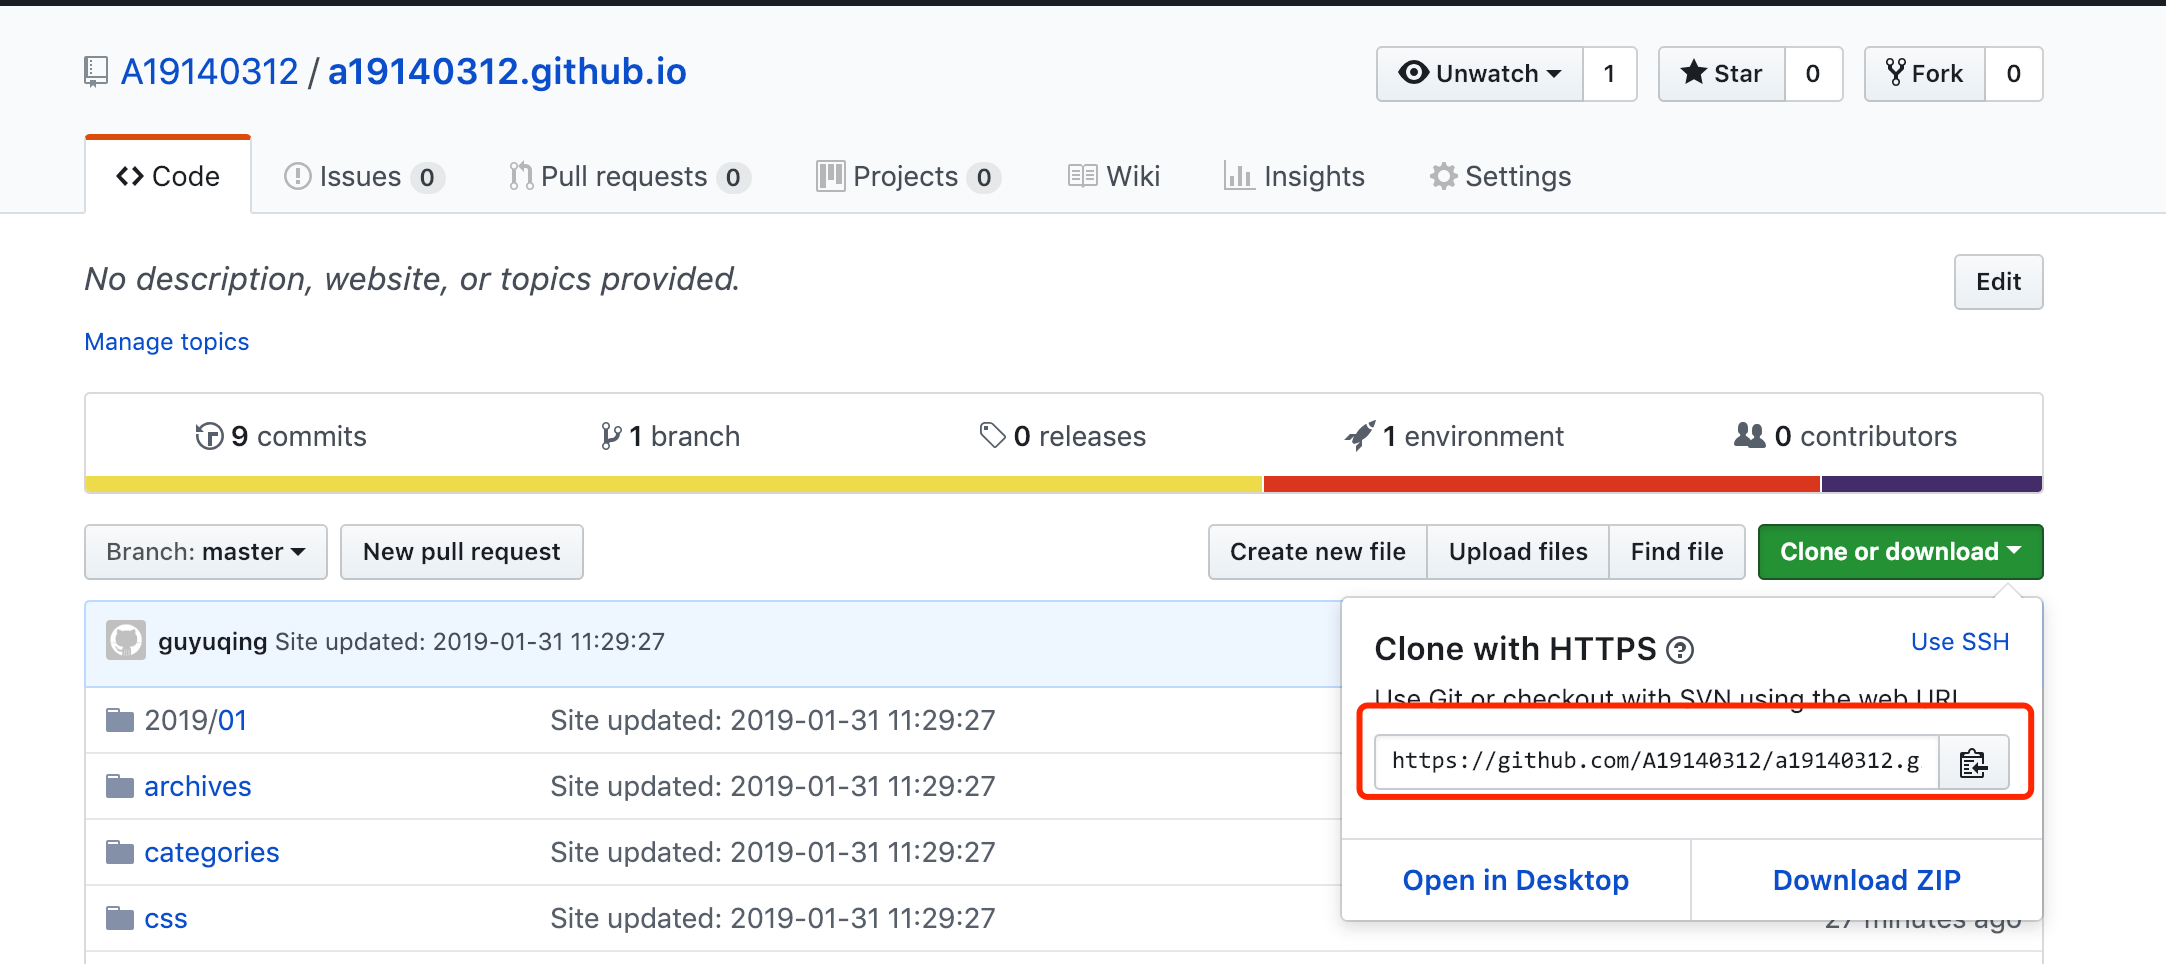
到你的本地项目根目录找到 _config.yml 文件,粘贴到以下位置

hexo设置git

站点配置

站点配置包括修改博客名称,描述,作者等等,建议直接查看官方教程

关联

安装 hexo-deployer-git 插件

1
$ yarn add hexo-deployer-git -S

如果失败的话尝试下面的方法

1
$ npm install --save hexo-deployer-git

在你的项目文件夹下运行 hexo d -g (生成本地文件并将本地文件推送到 GitHub ,和 git push 功能相同),如果失败的话前面加sudo

1
$  hexo d -g

这时访问你的github主页https://[用户名].github.io/就可以啦

NexT主题配置

NexT 是一个高质量并且优雅的Hexo 主题。
详细可见官方文档

安装NexT主题

在你的项目文件夹下,执行以下命令,安装NexT主题

1
$ git clone https://github.com/iissnan/hexo-theme-next.git themes/next

更改项目根目录下_config.yml 文件,如下
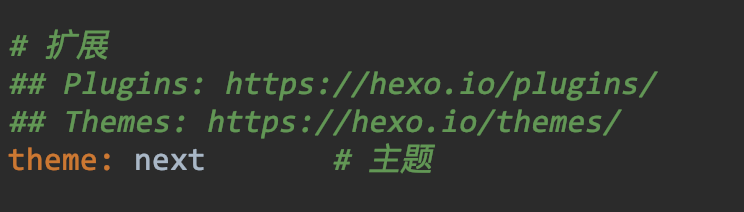
更改主题

重新生成本地文件并推送到github

1
$  hexo d -g

访问你的github主页https://[用户名].github.io/就可以看到啦

主题配置

themes/next文件夹下的_config.yml是主题的配置文件
next内置了4种主题方案,选择你喜欢的方案解开注释即可

1
2
3
4
5
6
7
8
9
# ---------------------------------------------------------------
# Scheme Settings
# ---------------------------------------------------------------

# Schemes
#scheme: Muse
scheme: Mist
#scheme: Pisces
#scheme: Gemini

Menu Settings是控制图中菜单的位置,根据需要解开注释即可

1
2
3
4
5
6
7
8
9
10
11
12
# ---------------------------------------------------------------
# Menu Settings
# ---------------------------------------------------------------
menu:
home: / || home
# about: /about/ || user
tags: /tags/ || tags
categories: /categories/ || th
# archives: /archives/ || archive
# schedule: /schedule/ || calendar
# sitemap: /sitemap.xml || sitemap
# commonweal: /404.html || heartbeat

更改菜单
还有很多很多的配置请参考官方教程,主题个性配置教程,主题美化

修改之后,运行以下命令就可以再你的主页看到啦

1
2
$  hexo clean
$ hexo d -g

也可以在本地启动服务器,在浏览器输入 localhost:4000 观看效果

1
$ hexo server

创建文章

添加【标签】页面

新建标签页面

1
$ hexo new page tags

修改项目根目录下 source/tags 的 index.md 文件如下:

1
2
3
4
title: tags
type: "tags"
comments: false
---

修改themes/next文件夹下的_config.yml主题配置文件,取消 tags: /tags/ || tags 这行注释
新建测试文章

1
$ hexo new 'test'

在测试文章的头部添加tags信息,如下:

1
2
3
4
5
title: 测试文章
tags:
- Testing
- Another Tag
---

启动本地服务,就可以看到标签菜单,点击可进入标签页,看到 如图所示 证明标签页面添加成功。
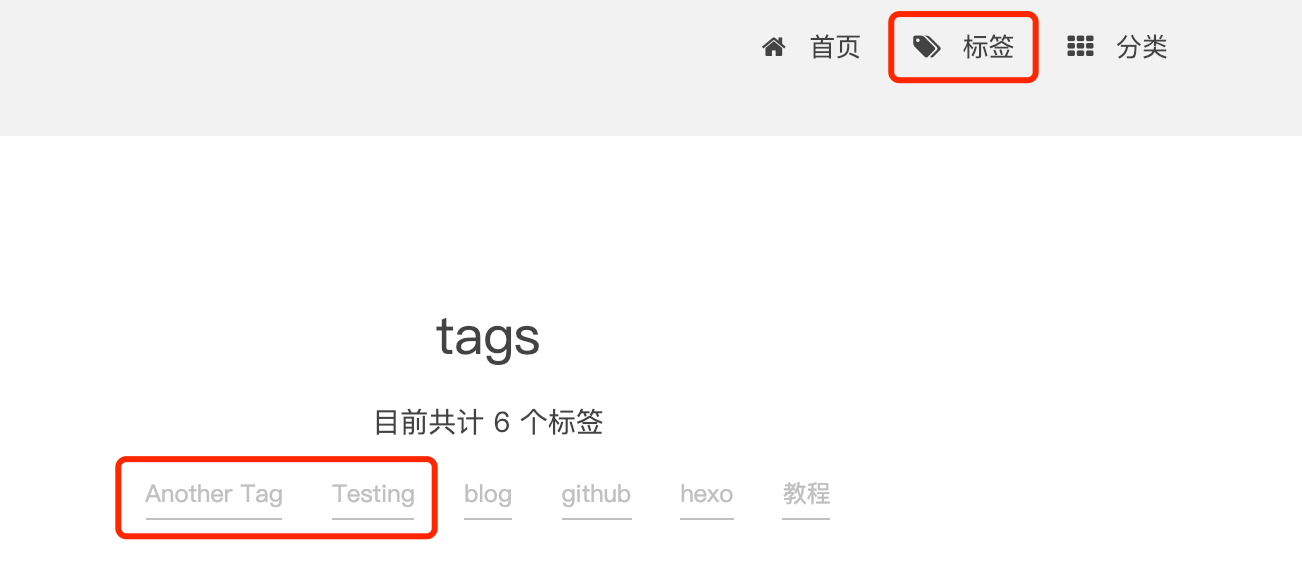
标签

添加【分类】页面

新建标签页面

1
$ hexo new page categories

修改项目根目录下 source/tags 的 index.md 文件如下:

1
2
3
4
title: categories
type: "categories"
comments: false
---

修改themes/next文件夹下的_config.yml主题配置文件,取消 categories: /categories/ || th 这行注释
在测试文章的头部添加categories信息,如下:

1
2
3
4
5
6
title: 测试文章
tags:
- Testing
- Another Tag
---
categories: Testing

启动本地服务,就可以看到标签菜单,点击可进入标签页,看到 如图所示 证明分类页面添加成功。
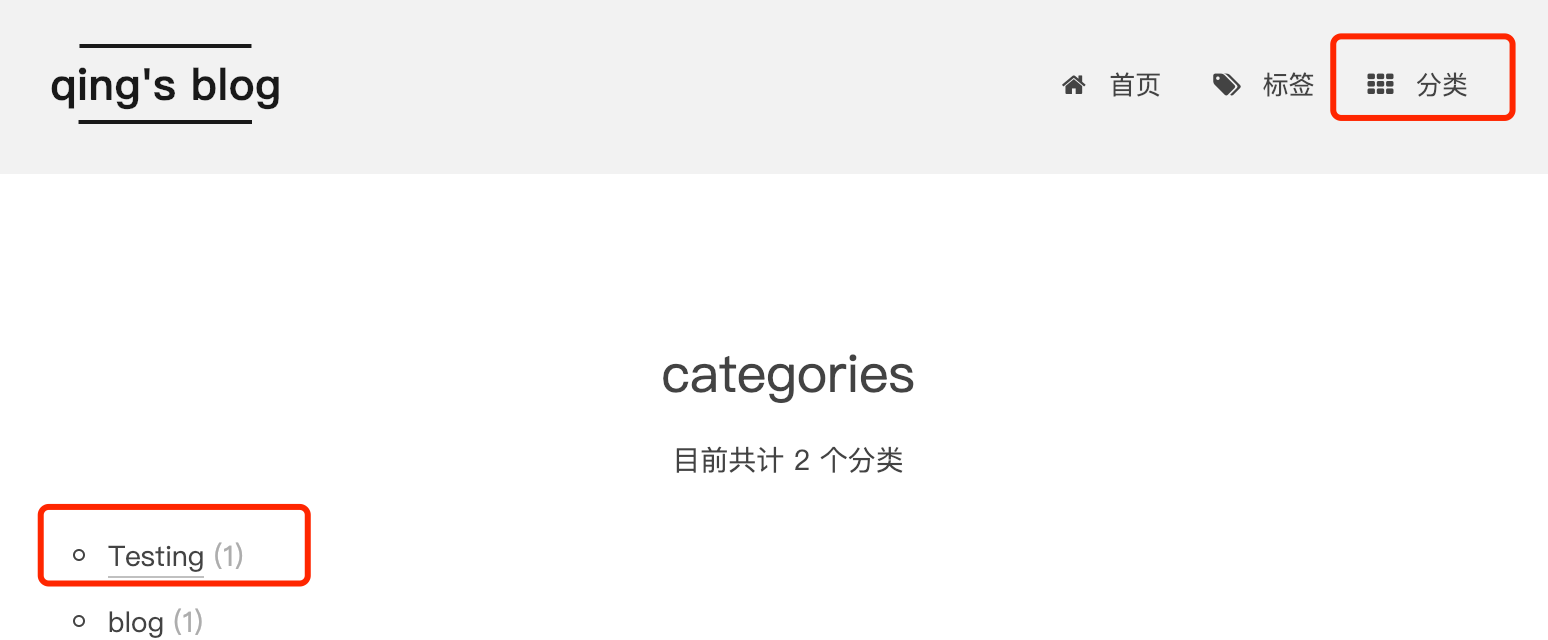
分类

给博客添加图片

在项目目录下执行

1
$ npm install hexo-asset-image --save

在用下面命令生成md文章时,会在_post目录下看到一个与文章同名的文件夹

1
$ hexo new '文章名'

将想要上传的图片先放到文件夹下,然后在博客中使用markdown的格式引入图片:

1
![文字](xxxx/图片名.jpg)

文章名和文件夹名字相同,所以不需要绝对路径,只要xxxx是文件夹的名字就可以了。

添加Valine评论系统

首先需要去注册一个Leancloud账号,验证邮箱
然后随便创建一个应用,按如图所示找到appidappkey
评论

按下图修改themes/next文件夹下的_config.yml主题配置文件,重新启动服务器就可以啦

1
2
3
4
5
6
7
8
9
10
11
12
13
# Valine.
# You can get your appid and appkey from https://leancloud.cn
# more info please open https://valine.js.org
valine:
enable: true
appid: your appid # your leancloud application appid
appkey: your appkey # your leancloud application appkey
notify: false # mail notifier , https://github.com/xCss/Valine/wiki
verify: false # Verification code
placeholder: 描述 # comment box placeholder
avatar: monsterid # gravatar style
guest_info: nick,mail # custom comment header
pageSize: 10 # pagination size

如果要删除评论请到Leancloud里删除哦
删除评论

hexo添加多作者

在项目目录下执行

1
$ npm install hexo-generator-author --save

在文章的头部添加author信息,如下:

1
2
3
4
5
6
title: 测试文章
tags:
- Testing
- Another Tag
---
author: Alice

修改/layout/_macro/下的post.swig文件 +为新添加的行

1
2
3
4
5
6
7
8
9
10
         <div class="post-meta">
+ <span itemprop="about" itemscope itemtype="https://schema.org/Thing">
+ <a href="/authors/{{ post.author }}" itemprop="url" rel="index">
+ <span itemprop="name">{{ post.author }}</span>
+ </a>
+ </span>
<span class="post-time">
<span class="post-meta-item-icon">
<i class="fa fa-calendar-o"></i>

在/layout下新创建author.swig文件

1
2
3
4
5
6
7
8
9
10
11
12
13
14
15
16
17
18
19
20
21
22
23
24
25
26
27
28
29
30
31
32
33
34
35

{% extends '_layout.swig' %}
{% import '_macro/post-collapse.swig' as post_template %}
{% import '_macro/sidebar.swig' as sidebar_template %}

{% block title %} {{ __('title.author') }}: {{ page.author }} | {{ config.title }} {% endblock %}

{% block content %}

<div class="post-block category">

<div id="posts" class="posts-collapse">
<div class="collection-title">

<{% if theme.seo %}h2{% else %}h1{% endif %}>{#
#}{{ page.author }}{#
#}<small>{{ __('title.author') }}</small>
</{% if theme.seo %}h2{% else %}h1{% endif %}>
</div>

{% for post in page.posts %}
{{ post_template.render(post) }}
{% endfor %}
</div>

</div>

{% include '_partials/pagination.swig' %}

{% endblock %}

{% block sidebar %}
{{ sidebar_template.render(false) }}
{% endblock %}

修改/layout下page.swig文件

1
2
3
4
5
6
7
8
9
10
11
12
13
14
15
16
17
18
19
20
21
22
23
24
25
26

{{ __('title.category') + page_title_suffix }}
{% elif page.type === "tags" %}
{{ __('title.tag') + page_title_suffix }}
+ {% elif page.type === "authors" %}
+ {{ __('title.author') + page_title_suffix }}
{% else %}
{{ page.title + page_title_suffix }}
{% endif %}

。。。。。。。
{{ list_categories() }}
</div>
</div>
+ {% elif page.type === 'authors' %}
+ <div class="author-all-page">
+ <div class="author-all-title">
+ {{ _p('counter.authors', site.authors.length) }}
+ </div>
+ <div class="author-all">
+ {{ list_authors() }}
+ </div>
+ </div>
{% else %}
{{ page.content }}
{% endif %}

修改{项目名称}/themes/next下zh-Hans.yml文件

1
2
3
4
5
6
7
8
9
10
11
12
13
14
15
16
title:
archive: 归档
category: 分类
tag: 标签
schedule: 日程表
author : 作者

。。。

counter:

authors:
zero: 暂无分类
one: 目前共计 1 个分类
other: "目前共计 %d 个作者"

在{项目名称}/themes/next/source/css/_common/components/pages/添加authors.styl,复制categories.styl内容将categorie改成author

在同级文件pages.styl中添加@import “authors”;

修改之后,运行以下命令就可以再你的主页看到啦

1
2
$  hexo clean
$ hexo d -g

###博文压缩

1
2
$ npm install gulp -g
$ npm install gulp-minify-css gulp-uglify gulp-htmlmin gulp-htmlclean gulp --save

在项目根目录下创建gulpfile.js并填入以下内容:

1
2
3
4
5
6
7
8
9
10
11
12
13
14
15
16
17
18
19
20
21
22
23
24
25
26
27
28
29
30
31
32
33
var gulp = require('gulp');
var minifycss = require('gulp-minify-css');
var uglify = require('gulp-uglify');
var htmlmin = require('gulp-htmlmin');
var htmlclean = require('gulp-htmlclean');
// 压缩 public 目录 css
gulp.task('minify-css', function() {
return gulp.src('./public/**/*.css')
.pipe(minifycss())
.pipe(gulp.dest('./public'));
});
// 压缩 public 目录 html
gulp.task('minify-html', function() {
return gulp.src('./public/**/*.html')
.pipe(htmlclean())
.pipe(htmlmin({
removeComments: true,
minifyJS: true,
minifyCSS: true,
minifyURLs: true,
}))
.pipe(gulp.dest('./public'))
});
// 压缩 public/js 目录 js
gulp.task('minify-js', function() {
return gulp.src('./public/**/*.js')
.pipe(uglify())
.pipe(gulp.dest('./public'));
});
// 执行 gulp 命令时执行的任务
gulp.task('default', [
'minify-html','minify-css','minify-js'
]);

生成博文是执行 hexo g && gulp 就会根据 gulpfile.js 中的配置,对 public 目录中的静态资源文件进行压缩。

-------- 本文结束 感谢阅读 --------

本文标题:Mac下利用Github Pages快速搭建免费博客

文章作者:Guyuqing

发布时间:2019年01月30日 - 19:30

最后更新:2021年09月16日 - 20:24

许可协议: 署名-非商业性使用-禁止演绎 4.0 国际 转载请保留原文链接及作者。

坚持技术分享,您的支持将鼓励我继续创作!
0%